One of the interesting projects I worked on this year was building Careem’s SuperApp. To do this, we combined Careem’s main two applications, the RideHailing application and the Food deliveries application, into a single app. This may sound simple at first, but it is actually an interesting problem with many layers to unravel.
I gave a talk about this at 360|AnDev this year. You can find the slides here.
update - i did a small presentation about this as part of TouchlabShare - you can watch the video here.
In the past few days, I began looking at multithreading in Kotlin Multiplatform more carefully when I started a new iOS/Android project that I wanted to share business logic for. I realized that, despite understanding the rules of multithreading in Kotlin Native, I didn’t fully grasp the implications thereof. I thought to write this blog post to share what I learned (and as a reference for my future self).
Note - the excellent Practical Kotlin Native Concurrency series from Kevin goes through a lot of these concepts in a lot more detail - I highly recommend reading the series. I hope that this post adds some value to that series by presenting some additional examples, especially viewed from the perspective of someone trying to use shared Kotlin multiplatform code in an iOS app.
The Rules and Concepts
As a review, the rules are that an object is either:
immutable (and therefore can be shared across multiple threads), or
mutable (and is confined to a single thread)
One important concept that applies heavily here:
freeze - freezes an object to be shared between threads - a frozen object is immutable (for the most part) - more on this later.
So let’s take some examples and see how things play out.
The Immutable Case
Singleton Objects
Let’s say that we have written the following multiplatform code:
// note - MathUtil() doesn't make a new instance, it's just// Swift syntax for getting the instance of the object.print(NSString(format: "number^2 is: %d", MathUtil().square(4)))
We can also do:
DispatchQueue.global(qos: .background).async {
   print(NSString(format: "number^2 from bg is: %d", MathUtil().square(4)))
}
This second example, while obvious in retrospect, is one I never realized before - you can actually call Kotlin multiplatform code from multiple threads on iOS if the code is immutable. This is a super useful building block that can be used for more complicated examples.
Note that this also works if MathUtil has some immutable val properties in there, because Kotlin Native will freeze those properties by default. This is an important point that will come into play later.
Class Instances
Let’s change things around a bit and consider a normal class (not an object/singleton).
In iOS, we can use a fresh instance from this class in any thread:
let ops = NumericOperations(amount: 42)
print(NSString(format: "42^2 from main: %d", ops.square()))

DispatchQueue.global(qos: .background).async {
  let bgOps = NumericOperations(amount: 10)
  print(NSString(format: "10^2 from background: %d", bgOps.square()))
}
Now what if we replaced bgOps.square() in the body of the async lambda in the snippet above with ops.square()? We’d get a crash:
Uncaught Kotlin exception: kotlin.native.IncorrectDereferenceException: illegal attempt to access non-shared net.cafesalam.test.common.NumericOperations@337f9a8 from other thread
at 0 SharedCode 0x0000000105ca0777 kfun:kotlin.Throwable.<init>(kotlin.String?)kotlin.Throwable +87 (/Users/teamcity1/teamcity_work/4d622a065c544371/runtime/src/main/kotlin/kotlin/Throwable.kt:22:37)
at 1 SharedCode 0x0000000105c93545
This is saying that we cannot use the instance of NumericOperations that we made on one thread on another, because it’s a non-shared instance.
But why? Doesn’t the first rule say that immutable objects (which our class instance clearly is), can be shared across multiple threads? To quote the Stranger Threads post:
As far as the KN runtime is concerned, all non-frozen state is possibly mutable, and restricted to one thread.
So let’s suppose (for whatever reason) that we actually wanted to share the same instance across multiple threads - we can do this by freezing the instance. To do this, we can do something like this:
So far, all the examples have only dealt with immutable data and data that could easily be frozen - let’s try adding some mutable state into the mix.
Singleton Objects
Let’s consider this example -
objectCounter {
var count: Int = 0}
If we try to use this from Swift from the main thread:
let counter = Counter()
counter.count = 42print(counter.count)
When we try to modify count, we get a crash -
Uncaught Kotlin exception: kotlin.native.concurrent.InvalidMutabilityException: mutation attempt of frozen net.cafesalam.test.common.SecondTestClass@a6abe8
at 0 SharedCode 0x000000010f42a777 kfun:kotlin.Throwable.<init>(kotlin.String?)kotlin.Throwable +87 (/Users/teamcity1/teamcity_work/4d622a065c544371/runtime/src/main/kotlin/kotlin/Throwable.kt:22:37)
This is because the properties of an object are all frozen by default. We can override this behavior by using the @ThreadLocal annotation on the object. @ThreadLocal says that each thread gets its own copy of this object.
Changing the code to instead look like this fixes the issue:
@ThreadLocalobjectCounter {
var count: Int = 0}
Now on iOS, we can do something like:
let counter = Counter()
counter.count = 42DispatchQueue.global(qos: .background).async {
let secondCounter = Counter()
secondCounter.count = 43// original counter is still at 42 because of ThreadLocal}
Note that if we were to try to share an instance between the ui thread and a background thread, we’d get an exception (due to the rules - if it’s not immutable, it must be confined to a single thread).
Class Instances
For normal classes with mutable variables, things are pretty straightforward - these instances are confined to the thread they were made on per the rules.
What if we want to have something be mutable but also be usable from multiple threads? How can we make that work?
Remember back to the point about freeze, when I mentioned that “a frozen object is immutable (for the most part).” The for the most part piece is because Kotlin Native has several interesting types - the atomic types. To quote the documentation:
Atomic values and freezing: atomics AtomicInt, AtomicLong, AtomicNativePtr and AtomicReference are unique types with regard to freezing. Namely, they provide mutating operations, while can participate in frozen subgraphs. So shared frozen objects can have fields of atomic types.
These types can exist within a frozen type (therefore being frozen) and can still be modified. So for example, we can have some shared code that looks like this:
// common/src/iosMain/kotlin/net/cafesalam/test/AtomicCounter.kt
objectAtomicCounter {
privateval count = AtomicInt(0)
funget(): Int = count.valuefunincrease(): Int = count.addAndGet(1)
}
We can then use this on iOS from multiple threads:
// main threadlet atomic = AtomicCounter()
// first incrementatomic.increase()
DispatchQueue.global(qos: .background).async {
// object is singleton, so this is the same instance as if we were// to just use atomic here directly.let counter = AtomicCounter()
print(counter.get()) // prints 1 counter.increase()
print(counter.get()) // prints 2}
Using these, especially AtomicReference, makes life a lot easier. Note that, like freeze, these types are only available in native code (i.e. not on jvm).
Global State
Top level values are (by default) declared on the main thread, preventing them from being used on other threads. Consider:
We can make an instance of TestClass on the main thread and use it, but we cannot make a fresh instance on a background thread. If we try to, we’d get an exception:
Uncaught Kotlin exception: kotlin.native.IncorrectDereferenceException: Trying to access top level value not marked as @ThreadLocal or @SharedImmutable from non-main thread
at 0 SharedCode 0x00000001045f15d7 kfun:kotlin.Throwable.<init>(kotlin.String?)kotlin.Throwable +87 (/Users/teamcity1/teamcity_work/4d622a065c544371/runtime/src/main/kotlin/kotlin/Throwable.kt:22:37)
We can use the @ThreadLocal or @SharedImmutable annotations on the top level variable to fix this issue (depending on the behavior we want). @SharedImmutable says that this variable is immutable and therefore can be shared across threads (essentially making it frozen).
Other Points
Note that, up until now, there has been no mention of the Worker class, nor of coroutines - this is pretty neat because, even without these, the existing building blocks allow us to run code in multiple threads on the target system itself.
It would be great to write shared code that does multithreading for us as well directly in commonMain. Both the Worker class and coroutines can be used to do this.
Here’s a small example using coroutines:
objectBackgroundCalculator {
fundoSomeWork(param: Param, callback: ((Result) -> Unit)) {
GlobalScope.launch {
val result = withContext(Dispatchers.Default) {
// heavy operation here that returns a Result
}
withContext(Dispatchers.Main) {
lambda(result)
}
}
}
}
Using the org.jetbrains.kotlinx:kotlinx-coroutines-core-common:1.3.5-native-mt artifact (or something newer), Dispatchers.Default is now backed by a single background thread, whereas Dispatchers.Main will point to the correct main thread on iOS / Android.
In this example, calling BackgroundCalculator.doSomeWork will return right away. Some time later, once the heavy calculation is done, it will call the callback that is passed in from the main thread. A sample usage could look like this:
BackgroundCalculator().doSomeWork(param: parameter) { (result: [Result]) in// this will be called on the main thread print(result)
}
Note that objects will be frozen when they are transferred between threads using withContext. This also shows how the basic rules that we mentioned at the very start of the article apply, even with context of coroutines and workers.
Tips
Q: Why couldn’t the cows moo at the same time?
A: Because they had a mootex.
isFrozen / ensureNeverFrozen
isFrozen and ensureNeverFrozen are your friends for debugging things. These are available in native code only, but using Stately’s common artifact, you can use them in common code only. (Note - Stately exposes these in common by implementing them as expect, where the actual implementation on native calls to the actual isFrozen / ensureNeverFrozen, and otherwise just returns false or does nothing).
i expect-ed this to be fun, but I didn’t realize that it would actually be fun.
Unit tests
Unit tests can help find many issues - for example:
This innocent looking test will fail with InvalidMutabilityException if you run it on iOS (i.e. ./gradlew :common:iosTest). We fix this by adding @ThreadLocal above the object declaration as mentioned above.
I learned this (and some other tricks - like how to test and catch the issue of global state without annotations not being accessible off the ui thread) - from this post from Jake Wharton. I really recommend reading it.
Special thanks to Kevin Galligan for reviewing this post.
TL;DR - adding default interface functions in Kotlin constitutes a source-compatible (but not necessarily a binary-compatible) change.
Whenever I used to run across issues mentioning binary compatibility, I used to always think, “this is super interesting, but that’s for library developers, I don’t have to worry about this while working on apps.” Little did I know how wrong I was.
This is a short story of my first encounter with an AbstractMethodError. But first, allow me to give a brief explanation of the landscape that made this possible.
Libraries and Modularization
As companies have to build and support multiple apps, it starts to make sense to share code or features across the apps. Larger companies sometimes achieve this sharing by referencing code via monorepos.
For smaller companies, pushing internal libraries and features to a private maven repository is a good way to achieve this. This is where my story begins.
Setting the Stage
Let’s say I have a common styles library that I share between my apps. Imagine that version 1.0 of this library, net.helw.common.ui:style:1.0, has one interface that looks like this:
interfaceColorProvider {
funcolorPrimary(): Int
funcolorSecondary(): Int
}
Let’s also say that I share a common login feature between my apps - and suppose that version 1.0 of my login feature, net.helw.app.feature:login:1.0, has this implementation:
My Android app (which depends on net.helw.app.feature:login:1.0 and on net.helw.common.ui:style:1.0) has a class that looks like this:
objectColorUtil {
fungetContrastingColor(colorProvider: ColorProvider): Int {
// logic here
}
}
So far everything is great!
A Well-Intentioned Change
The designer asks me to add a new colorPrimaryVariant, and says that “in some cases it can be the same as colorPrimary, but generally it will be different.”
Ok, so I’ll just update ColorProvider to support colorPrimaryVariant and publish a new version. I don’t want to break compatibility, so I will use a default method, thinking I’ll be safe:
interfaceColorProvider {
funcolorPrimary(): Int
funcolorSecondary(): Int
funcolorPrimaryVariant(): Int = colorPrimary()
}
I update the net.helw.common:ui:style library to 1.1 and push it to maven.
I also update my app to use this 1.1 version of the library and update getContrastingColor call to use this colorPrimaryVariant method and use it in my computation somehow. My app still depends on versions 1.0 of login.
I compile my app and run it. I expected everything to work, but instead, I was greeted with an error that looked like this:
Exception in thread "main" java.lang.AbstractMethodError: ColorUtil.colorPrimaryVariant()
Digging Deeper
If we look at the decompiled Java bytecode for ColorProvider after adding the method, it looks something like this:
So we can see that at compile-time, Kotlin added an implementation of colorPrimaryVariant to my interface, asking it to call the static method it added.
But if this is the case, why did it break?
Classes in the AAR
An aar typically contains (among resources and other things) a file named classes.zip. This file contains .class files of all the code in the library (not source files). This means that my login aar file contains class files as they were compiled against the 1.0 version of my styles library.
In other words, the decompiled Java code of my LoginColorProvider really looks like this:
If I were to recompile the login module against the 1.1 version of styles, the new method implementation would be there (calling the static method), but since I didn’t, it is nowhere to be seen.
Putting it all Together
My login feature was compiled against styles 1.0 (without the new method). But because my actual app used styles 1.1 to call the new method, it requested Gradle to use styles 1.1. Gradle saw the conflict and upgraded everything to use 1.1. Everything compiles fine - but at runtime, we get an AbstractMethodError because the new method can’t be found.
This is an example of binary compatibility breaking.
Solution
The easiest solution here is to publish an updated versions of login that depends on the 1.1 version of the style library.
Alternatively, instead of adding a default implementation, we can have sub-interfaces and the code can check against them as is appropriate. For example:
interfaceVariantColorProvider : ColorProvider {
funcolorPrimaryVariant(): Int = colorPrimary()
}
This way, getContrastingColor could look like this:
objectColorUtil {
fungetContrastingColor(colorProvider: ColorProvider): Int {
returnwhen (colorProvider) {
is VariantColorProvider -> colorProvider.colorPrimaryVariant()
else-> colorProvider.colorPrimary()
}
}
}
There doesn’t seem to be any static analysis solutions for catching this type of issue, but the japicmp tool can be used to detect when a binary incompatible change is made between two library versions.
There is, however, one more solution.
What about Java 8 / @JvmDefault?
I was curious, “are the default interface methods in Java 8 binary compatible?” - turns out that the answer to this is “mostly.” The JLS says:
Adding a default method, or changing a method from abstract to default, does not break compatibility with pre-existing binaries, but may cause an IncompatibleClassChangeError if a pre-existing binary attempts to invoke the method.
(Note that the JLS link also shows an interesting case where you’d get an IncompatibleClassChangeError that’s worth looking at. Because of this, japicmp, the open source API comparison tool, intentionally marks new methods in interfaces as errors).
In our case, if we were asking Kotlin to output Java 8 code with the -Xjvm-default=enable flag (and with the @JvmDefault annotation), everything would actually work. (Note: Zac Sweers has an in-depth article about @JvmDefault that’s worth reading).
On Android, if we annotate the default method as @JvmDefault and set the -Xjvm-default=enable flag, D8 will actually add a synthetic method to call through to the static method, even if the class was compiled against the old version of the library!
Today, Google released the first alpha of ViewPager2. I had been looking at the code as it was developed in the Android X repository for a while now, and wanted to write a bit about how it works.
Motivations
ViewPager2 builds on top of the versatile RecyclerView to make ViewPager2 a worthy successor to ViewPager.
Per the release notes, there are 3 major features that ViewPager2 adds:
RTL support - ViewPager’s never natively supported RTL. In order to support it, you’d either have to manually reverse the pages yourself, or use a library that does it for you.
Vertical orientation - while you could always use a RecyclerView or the like to achieve this, you don’t get the snapping behavior out of the box without implementing it yourself.
notifyDataSetChanged now works - the old ViewPager’s notifyDataSetChanged didn’t recreate the page (a common workaround was to override getItemPosition to return POSITION_NONE).
I’d argue that a 4th major feature is the ability to inter-op adapters with RecyclerViews. The replacement for PagerAdapter is now RecyclerView.Adapter, which means that any RecyclerView adapter can just be used as is within ViewPager2. It also opens the door to using the more granular notifyDataSetChanged type functions (notifyItemInserted, notifyItemChanged, etc) directly or via DiffUtil.
A Quick Sample
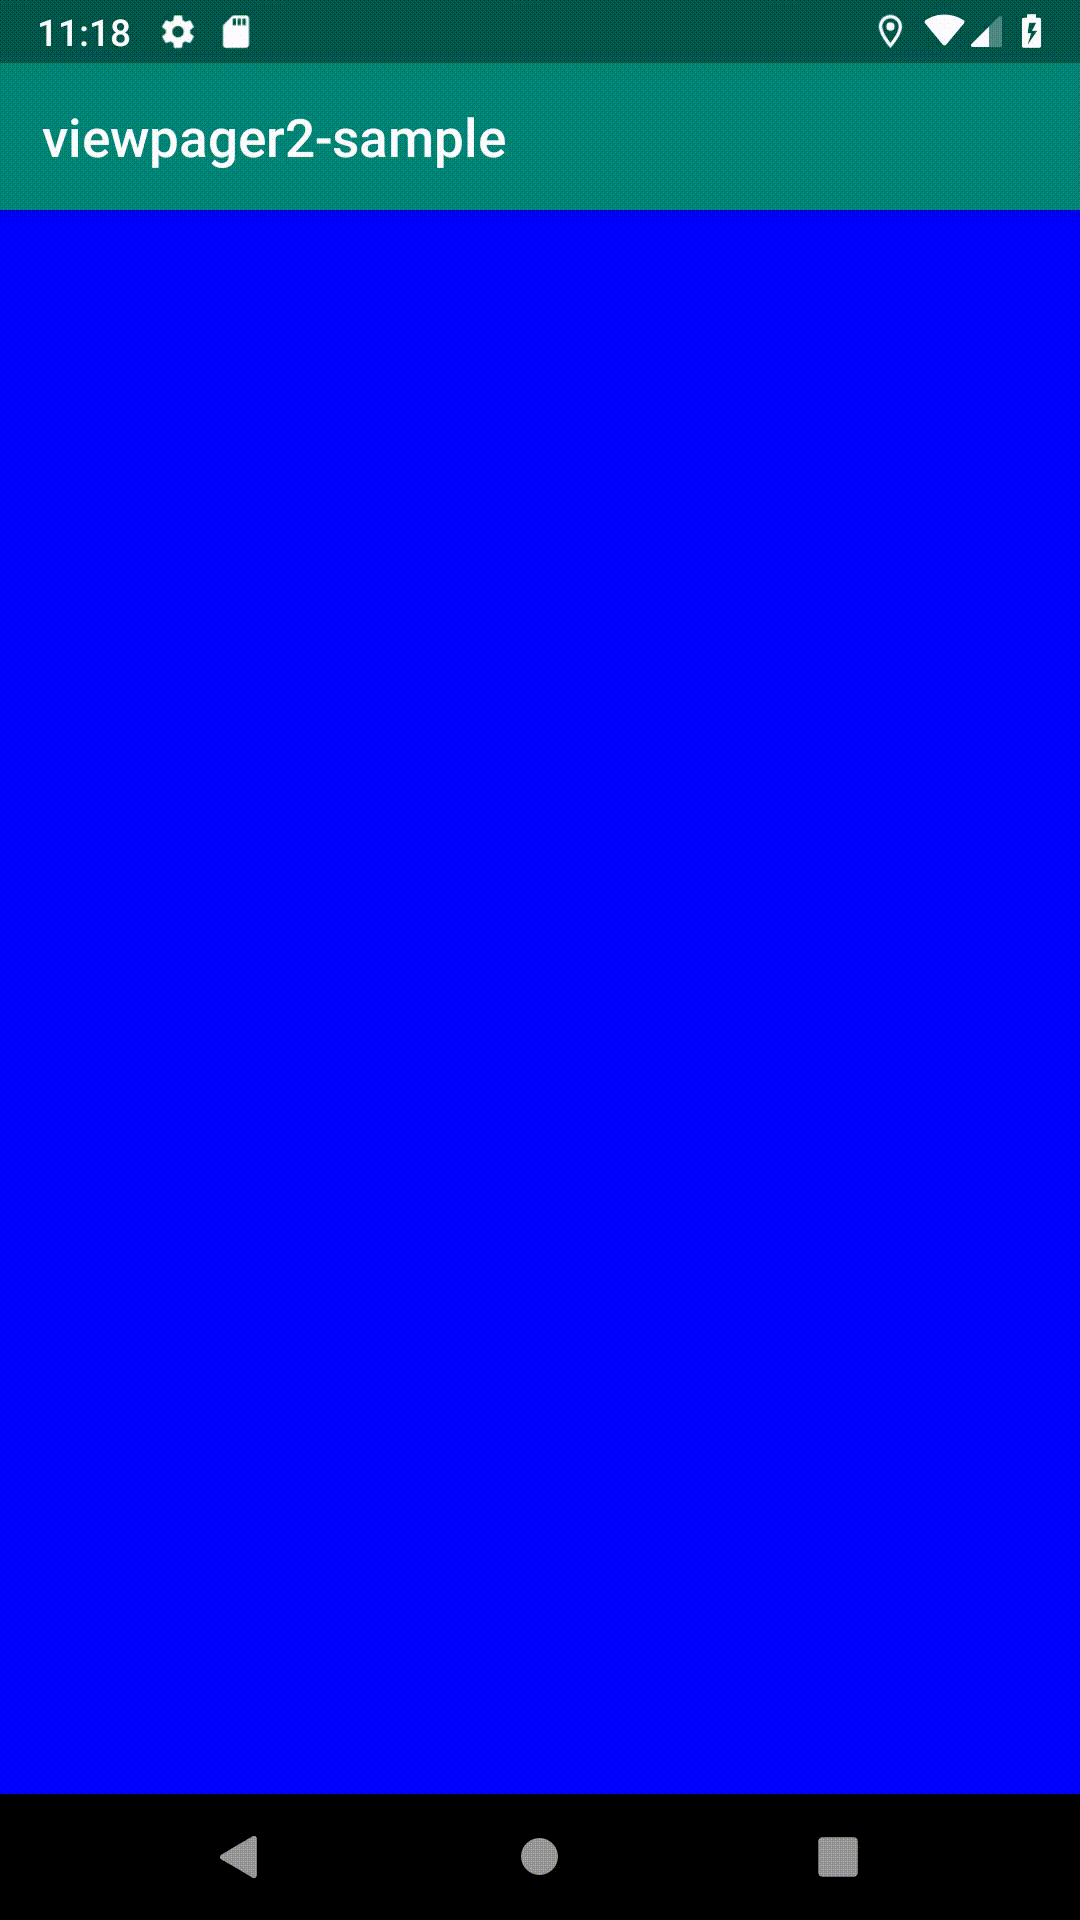
Before diving in to how ViewPager2 is implemented, below is a really quick example of how to use it with views. For more detailed samples, please see the the official ViewPager2 Demos.
import android.graphics.Color
import android.os.Bundle
import android.view.View
import android.view.ViewGroup
import androidx.appcompat.app.AppCompatActivity
import androidx.recyclerview.widget.RecyclerView
import androidx.viewpager2.widget.ViewPager2
classMainActivity : AppCompatActivity() {
privateval data = intArrayOf(Color.BLUE, Color.RED, Color.GRAY, Color.GREEN, Color.YELLOW)
overridefunonCreate(savedInstanceState: Bundle?) {
super.onCreate(savedInstanceState)
setContentView(R.layout.main)
val viewPager = findViewById<ViewPager2>(R.id.viewpager)
// optionally, for vertical orientation
// viewPager.orientation = ViewPager2.ORIENTATION_VERTICAL
viewPager.adapter = object: RecyclerView.Adapter<ItemHolder>() {
overridefunonCreateViewHolder(parent: ViewGroup, viewType: Int): ItemHolder {
val view = View(parent.context)
// limitation: ViewPager2 pages need to fill the page for now
view.layoutParams = ViewGroup.LayoutParams(
ViewGroup.LayoutParams.MATCH_PARENT,
ViewGroup.LayoutParams.MATCH_PARENT)
return ItemHolder(view)
}
overridefungetItemCount(): Int = data.size
overridefunonBindViewHolder(holder: ItemHolder, position: Int) {
holder.itemView.setBackgroundColor(data[position])
}
}
}
classItemHolder(view: View) : RecyclerView.ViewHolder(view)
}
ViewPager2 can also be used with fragments, using the FragmentStateAdapter. It has 2 required methods - one for the number of items, and one for getting the item.
For more examples, see the official ViewPager2 Demos that are part of AndroidX.
Under the Hood
In order to get an overview of how ViewPager2 is built, let’s start by going back in history to the very first commit for it in AndroidX. The initial version of ViewPager2 was only 175 lines long and serves to give us a good idea of how it is built and how it works.
ViewPager2’s Initial Commit
View Construction
ViewPager2 is a ViewGroup. All of its constructors call an initialize method, which creates a RecyclerView, sets its layout manager to a LinearLayoutManager, and attaches the RecyclerView to itself. It also creates and attaches a PageSnapHelper (this is what supports page snapping).
Measure and Layout
As we’d imagine, there’s an implementation of onMeasure to measure the view. This first asks its internal RecyclerView to measure itself. It adjusts the width and height to add any padding set on the ViewPager2, and uses the maximum between the calculated width/height and the suggested minimum width and height (these suggestions come either from the background (if one is set, and in this case, one isn’t set), or from android:minWidth and android:minHeight if they are defined).
There’s also an onLayout, which lays out the internal RecyclerView while respecting padding (though a note in the source says that this may potentially be delegated to the RecyclerView itself one day to avoid page transition bugs) and setting a gravity of start and top.
Other
There are 2 remaining functions in the initial ViewPager2 implementation that remain in the current master version - onViewAdded, which is called when a view is added to the ViewGroup - this currently throws an exception (with a TODO to add support for decor views).
Finally, there is a setAdapter - this just sets the adapter on the RecyclerView. (In the old initial commit, this wrapped the Adapter with one that ensured that the width and height of the child are MATCH_PARENT. Today, this enforcement is in an enforceChildFillListener method, which it does via a RecyclerView.OnChildAttachStateChangeListener).
(Note - for completion’s sake, the initial commit also had a method to addOnScrollListener, which was just handed down to the RecyclerView).
ViewPager2 Today
Today, ViewPager2 supports many of ViewPager’s APIs that weren’t supported in the initial commit. The vast majority of the new code in today’s ViewPager2 is for adding support for:
saving and restoring state
setting orientation (this just passes the parameter to the LinearLayoutManager).
support for getCurrentItem and setCurrentItem
ability to add an OnPageChangeCallback (similar to ViewPager.OnPageChangeListener from the legacy ViewPager).
setPageTransformer, which lets transformations be applied to each page while it is scrolling.
Saving and Restoring state
In onSaveInstanceState, the ViewPager2 saves:
the id of the RecyclerView - the RecyclerView’s id was set in the constructor to ViewCompat.generateViewId, which generates an id that won’t clash with existing R.id values.
the orientation
the current item position
whether or not a scroll was in progress - this is done by asking the LayoutManager for the first completely visible item on the screen and comparing it to the current item.
an optional Parcelable containing the adapter’s state if the adapter is a StatefulAdapter.
A method called onDispatchRestoreInstanceState is what ultimately calls restoreInstanceState during restoration. This method gets the state as a Parcelable from its parent and reads the old RecyclerView’s id. It then replaces the mapping for the RecyclerView’s data from its old id to its current id (since the id is generated by the constructor). This allows the new RecyclerView to restore using the old one’s state.
restoreInstanceState restores the saved values variables back. If the ViewPager2 died while it was scrolling, it temporarily nulls out the OnPageChangeCallback to avoid propagating events. It then posts a message to set the callback back, and calls a scrollToPosition on the RecyclerView to go back to the restored item position. The removing and re-adding of the callback is done to avoid sending out a scroll event when this happens.
Translating RecyclerView scrolls to ViewPager2 events
Like its predecessor, ViewPager2 provides support for getting and setting the current page. How does this work, especially when RecyclerView has no such method for getCurrentItem or setCurrentItem?
RecyclerView allows us to set an RecyclerView.OnScrollListener. This interface has 2 methods:
// newState is one of RecyclerView's constants for:// SCROLL_STATE_IDLE, SCROLL_STATE_DRAGGING, or SCROLL_STATE_SETTLINGvoidonScrollStateChanged(RecyclerView recyclerView, int newState);
voidonScrolled(RecyclerView recyclerView, int dx, int dy);
ViewPager2 has a helper class called ScrollEventAdapter, which maps calls from RecyclerView.OnScrollListener to calls to OnPageChangeCallback (the ViewPager2 equivalent of ViewPager.OnPageChangeListener). OnPageChangeCallback has 3 methods:
publicvoidonPageScrolled(int position,
float positionOffset,
@Pxint positionOffsetPixels);
publicvoidonPageSelected(int position);
// state is one of ViewPager2's constants for:// SCROLL_STATE_IDLE, SCROLL_STATE_DRAGGING, or SCROLL_STATE_SETTLINGpublicvoidonPageScrollStateChanged(@ScrollStateint state)
The ScrollEventAdapter class maintains 3 values in an internal class called ScrollEventValues
position (the adapter position of the first visible item in the RecyclerView - gotten using LayoutManager’s findFirstVisibleItemPosition)
the offset in pixels (this is just “how much of this view is off the screen?”)
the offset as a percentage (dividing the offset by the width for horizontal pagers and by the height for vertical ones).
With a method to calculate the ScrollEventValues, the class can then map the RecyclerView scrolled events into the corresponding ViewPager2 page events.
This serves 2 main purposes:
to maintain the currentItem (for getCurrentItem and setCurrentItem) by means of listening to this class internally, and
to dispatch these events to listeners who call registerOnPageChangeCallback. This also allows PageTransformer to work.
Scrolling (and smooth scrolling) are implemented by calling scrollToPosition or smoothScrollToPosition on the RecyclerView (for longer jumps, it first scrolls to a nearby position and then smooth scrolls to the actual desired position).
Page Transformations
The ViewPager2 allows for transforming pages when they scroll by passing in a PageTransformer through the setPageTransformer method. This method is fired on every onPageScrolled event. The PageTransformer gets called with 2 parameters - the View, and the position - the position is a value of where between -1 and 1 relative to the current page position. 0 means this is the current page. 1 means the page is one entire page to the right, and -1 means the page is one entire page to the left.
So if we scroll from page 1 to page 2 (in an LTR, horizontal ViewPager2), the PageTransformer for page 1 is fired for decreasing values between 0 and -1, and page 2 is fired for increasing values between 1 and 0. If we go the other way (from page 2 back to page 1), page 1 has its transformer fire for values between -1 and 0, and page 2 has its transformer fired for values between 0 and 1.
Here’s a simple example of fading the outgoing page out and the incoming view in:
    val transformer = ViewPager2.PageTransformer { page, position ->
      page.apply {
        page.alpha = 0.25f + (1 - Math.abs(position))
      }
    }

    viewPager.setPageTransformer(transformer)
Here’s a demo of this in action (animated gif):
A quick note about RTL
The RTL support for ViewPager2 comes directly from the existing LinearLayoutManager used by a good portion of RecyclerViews. Like LinearLayout, LinearLayoutManager will draw the views backwards if the RTL flag is set.
Summary
ViewPager2 is a nice replacement for ViewPager built on top of RecyclerView. In addition to the support for RTL, the fact that the adapters are RecyclerView.Adapters is amazing - not just for the fact that it’s easy to inter-op with RecyclerViews, but for the ability to use specific methods like notifyItemChanged, notifyItemInserted, etc directly. DiffUtil can also be used with ViewPager2.
There are some limitations mentioned on the release page, but hopefully these will be resolved as time goes on (especially as this is just the first alpha).
As for features, I hope that one day, ViewPager2 will support more of RecyclerView’s functionality, like ItemDecorations (useful for drawing gaps between pages, for example).
One of the features of the Android emulator that I knew about but never used until recently is snapshots. The snapshot feature lets the emulator save its current state (including the state of the file system, installed apps, etc) and lets the developer reload it again at any time.
This feature is amazing for testing upgrades and fixing upgrade related issues. Install the old version of the app, and do any required setup (preferences that need to be set, data that needs to be added, etc). Take a snapshot. Install the new version and test or debug. Need to go back to the old version? Just load the snapshot again and you’re back to exactly where you left off when you took the snapshot.
This feature could be useful for other things - for example, one could have a snapshot logged into account A and another logged into account B. This makes it easy to test features on different account types without having to log out and log in again.
Today, it’s likely that most newly written Activitys extend AppCompatActivity. The fact that it adds backwards compatibility has made life significantly easier for us as Android developers. Yet, how does it work? Specifically, how does it replace a TextView in a xml layout with an AppCompatTextView? This post aims to do a deep dive into one aspect of AppCompatActivity - view inflation.
Factory2
In Android, we often write our layouts in xml files. These are bundled with our app (converted to binary xml for performance reasons by aapt/2), and are then inflated at runtime by using LayoutInflater.
There are two neat little methods present on a LayoutInflater called setFactory and setFactory2 - this method’s documentation says:
Attach a custom Factory interface for creating views while using this LayoutInflater. This must not be null, and can only be set once; after setting, you can not change the factory. This is called on each element name as the xml is parsed. If the factory returns a View, that is added to the hierarchy. If it returns null, the next factory default onCreateView(View, String, AttributeSet) method is called.
Note that Factory2 implements Factory, so for any api 11+ apps, setFactory2 is what should be used. This essentially gives us a way to intercept the creation of every tag (view element) in xml. Let’s see this in practice:
When we run this and use Android Studio’s Layout Inspector, we find that all our TextViews are now RedTextViews - awesome!
AppCompatActivity and Factory2
If we just change the FactoryActivity above to extend AppCompatActivity instead, we’ll see that our TextViews are, indeed, RedTextViews, but the Button we added remains a Button instead of becoming an AppCompatButton. Why?
The first two lines of AppCompatActivity’s onCreate are:
final AppCompatDelegate delegate = getDelegate();
delegate.installViewFactory();
getDelegate() returns the correct delegate depending on the api version (AppCompatDelegateImplV14, AppCompatDelegateImplV23, AppCompatDelegateImplN, etc). The next method installs the view factory - this code calls setFactory2 when layoutInflater.getFactory returns null - it does nothing otherwise.
The fact that our Button does not change now makes sense since AppCompatActivity doesn’t install its Factory when one is already installed.
Note that the setFactory2 in FactoryActivity is before super.onCreate - if it isn’t, setFactory2 will throw an exception when the parent is AppCompatActivity, since it sets its own Factory2, and as the documentation says, “This must not be null, and can only be set once; after setting, you can not change the factory.”
Playing nice with AppCompatActivity’s Factory2
So what if I want to have my own Factory2, but I also want to let AppCompatActivity run its Factory? Let’s look at some ways to do this.
Delegating to AppCompatDelegate
Inside of AppCompatDelegate, we can see a method called createView (not to be confused with onCreateView that is implementing Factory and Factory2):
/**
* This should be called from a
* {@link android.view.LayoutInflater.Factory2 LayoutInflater.Factory2}
* in order to return tint-aware widgets.
* <p>
* This is only needed if you are using your own
* {@link android.view.LayoutInflater LayoutInflater} factory, and have
* therefore not installed the default factory via {@link #installViewFactory()}.
*/publicabstract View createView(@Nullable View parent,
String name,
@NonNull Context context,
@NonNull AttributeSet attrs);
With this information, we can just change our setFactory2 call to delegate to AppCompatDelegate’s when we don’t want to handle it:
Running this, we indeed see that our TextViews have become RedTextViews, and that our Button has become an AppCompatButton - success!
Overriding the viewInflaterClass
If we look at createView from AppCompatDelegate, we’ll see code that it instantiates an AppCompatViewInflater using reflection if one is not already set. The specific class it instantiates comes from R.styleable.AppCompatTheme_viewInflaterClass, which is set to AppCompatViewInflater by default.
By setting the theme for FactoryActivity to something like:
Google’s Material Design Components project actually uses this approach to override the creation of each Button with a corresponding MaterialButton that subclasses AppCompatButton, as can be seen here.
This approach is very powerful, since it allows an app that uses a library like Material Design Components to get tinting and material design buttons by doing nothing except setting the proper theme.
Note that AppCompatViewInflater also provides a fallback createView method that can be overridden to override new components that aren’t handled by default (it is called if the base AppCompatViewInflater doesn’t handle the particular widget type).
Custom LayoutInflater
A third way to do this is by having your own LayoutInflater that is always returned when getSystemService is called via a ContextThemeWrapper (installed by overwriting attachBaseContext on the Activity). This custom LayoutInflater can then wrap setFactory2 method calls to call the underlying Factory2, and to call its own logic before or after. This method is used by the ViewPump library (which is where I learned about it).
Implementation Details
This section covers some of the nitty gritty implementation details of AppCompatDelegate’s way of view inflation (since I found it pretty interesting and learned a few things along the way here).
onCreateView
We’d expect the Factory2’s onCreateView method just to call directly to createView (mentioned in Delegating to AppCompatDelegate above). In fact, it does do that, but looking at the code, there’s an extra bit - a call to callActivityOnCreateView. In AppCompatDelegateImplV14 this looks like this:
@Override View callActivityOnCreateView(View parent,
String name,
Context context,
AttributeSet attrs) {
// On Honeycomb+, Activity's private inflater factory will handle// calling its onCreateView(...)returnnull;
}
Looking at LayoutInflater’s source, we can see that part of createViewFromTag tries to get the view from the factory, and, upon not finding it, falls back to mPrivateFactory, and finally falling back to trying to create the class that the tag refers to. mPrivateFactory is set by Activity in its constructor. (Interestingly enough, it is this mPrivateFactory that is responsible for inflating fragments as seen here).
On Gingerbread through Honeycomb, LayoutInflater doesn’t have a notion of mPrivateFactory to allow the Activity to run its own fallback logic for creating views. Consequently, callActivityOnCreateView calls this method to allow that code to run on older APIs. This is mostly irrelevant now since AppCompat is now 14+ anyway, but an interesting thing I learned from this is about Window.Callback.
Window.Callback is an API from a Window back to its caller. This allows the client to intercept key dispatching, panels and menus, etc. It is wrapped by AppCompatActivity to allow it to handle certain events like a key being pressed (to handle menu and back button presses) among other things.
createView
At a high level, createView in AppCompatDelegateImplV9 does 2 things - first, it creates the AppCompatViewInflater or respective subclass reflectively, reading from the theme as mentioned in Overriding the viewInflaterClass above. Second, it asks this inflater to create the view.
createView on AppCompatViewInflater figures out the correct context (taking into account app:theme and android:theme as necessary along with wrapping the context for tinting as necessary), and thereafter creates the proper AppCompat flavored widget, depending on the name passed in (i.e. if it’s a TextView, call createTextView which returns an AppCompatTextview, and so on).
Supporting app:theme
On Lollipop and above, app:theme can be applied to a view to override the theme for that specific view and its children. AppCompat replicates this behavior pre-api 21 by inheriting the context of the parent view (so long as that parent view is not the root view of the layout being inflated).
Before AppCompat tries to inflate the view, it gets the parent context (assuming it should inherit it as per above), and then tries to create a themed context containing android:theme if pre-Lollipop (since Lollipop handles android:theme automatically) and app:theme otherwise. This makes sure the widget is inflated with the correct context.
As an aside, AppCompat will also wrap the context with a TintContextWrapper pre-Lollipop (api 21) if the developer explicitly asked to allow for appcompat vectors to be used from resources (to allow vector drawable usage in things like android:src) via the disabled by default call to setCompatVectorFromResourcesEnabled on AppCompatDelegate.
Creating the View and Fallbacks
Given this information, the code is ready to figure out what view to create - it goes through a list of supported widgets in a switch statement, handling the common views like TextView, ImageView, etc by generating their AppCompat subclasses. If the view is of an unknown type, it calls createView with the correct Context (this method returns null by default, but may have been overwritten by a subclass of AppCompatViewInflater).
If the view is still null at this point, there is a check to see if the view’s original Context is different than its parent’s. This happens when android:theme on the child is different from that on its parent. In order to replicate the behavior of Lollipop and let children inherit the parent’s theme, AppCompat attempts to reflectively create the view with the correct Context in these cases.
After some code for fixing android:onClick behavior for ContextWrappers, the View is returned. If this View is still null, the LayoutInflater will try to inflate it by creating the underlying view.
Summary and use cases
In summary, AppCompatActivity sets a Factory2 on a LayoutInflater to intercept view creation to handle backwards compatibility (adding tinting support to the widgets, handling android:theme, etc). It also keeps this expandable so a developer can have custom handling here as well.
Outside of AppCompat, this trick has been used to accomplish many interesting things - among the first I saw were those done by the (now deprecated) Probe library. Using a combination of Factory2 and a Gradle plugin, a developer could easily enable an OvermeasureInterceptor to identify extra measure passes, or a LayoutBoundsInterceptor to highlight the bounds of a View.
The Calligraphy library uses this trick to make it easy to add fonts to TextViews. It uses the ViewPump library (mentioned earlier), which also lists some potential uses on its recipes wiki.
Finally, Google’s Material Components for Android project installs its own AppCompatViewInflater to replace Buttons with MaterialButtons.
I gave my second talk at droidcon dubai this year with my coworker, Oubai Abbasi. We spoke about the importance of continuous integration on Android, along with some of the nice things that it can help catch and that you can do with it. Here is a link to the speakerdeck.
as we already know, generics in java are a compile time concept to help
enforce type safety. during compilation, type erasure kicks in, resulting in
the underlying bytecode being free of any generics information.
sometimes, however, we need generics information at runtime (such as when we
need to convert a json string into its object form, for example). i was
curious, how does this work given that types are erased at compile time? in
other words, how does gson’s TypeToken class work?
in other words, why does doing this work when there are no generics at runtime
(especially when, instead of String, the object type is a custom data object,
for example?)
final Type typeToken =new TypeToken<List<String>>(){}.getType();
final String json ="[\"one\", \"two\"]";
final List<String> items =new Gson().fromJson(json, typeToken);
in summary, the java language spec specifies what the erased type of
parameterized types, nested types, array types, and type variables is. it
then says that “the erasure of every other type is the type itself.”
TypeToken uses this fact to maintain generics information. as the TypeToken
class’s javadoc says:
Forces clients to create a subclass of this class which enables retrieval the type information even at runtime.
stepping back
stepping back a bit, it’s pretty phenomenal seeing the effects of type erasure
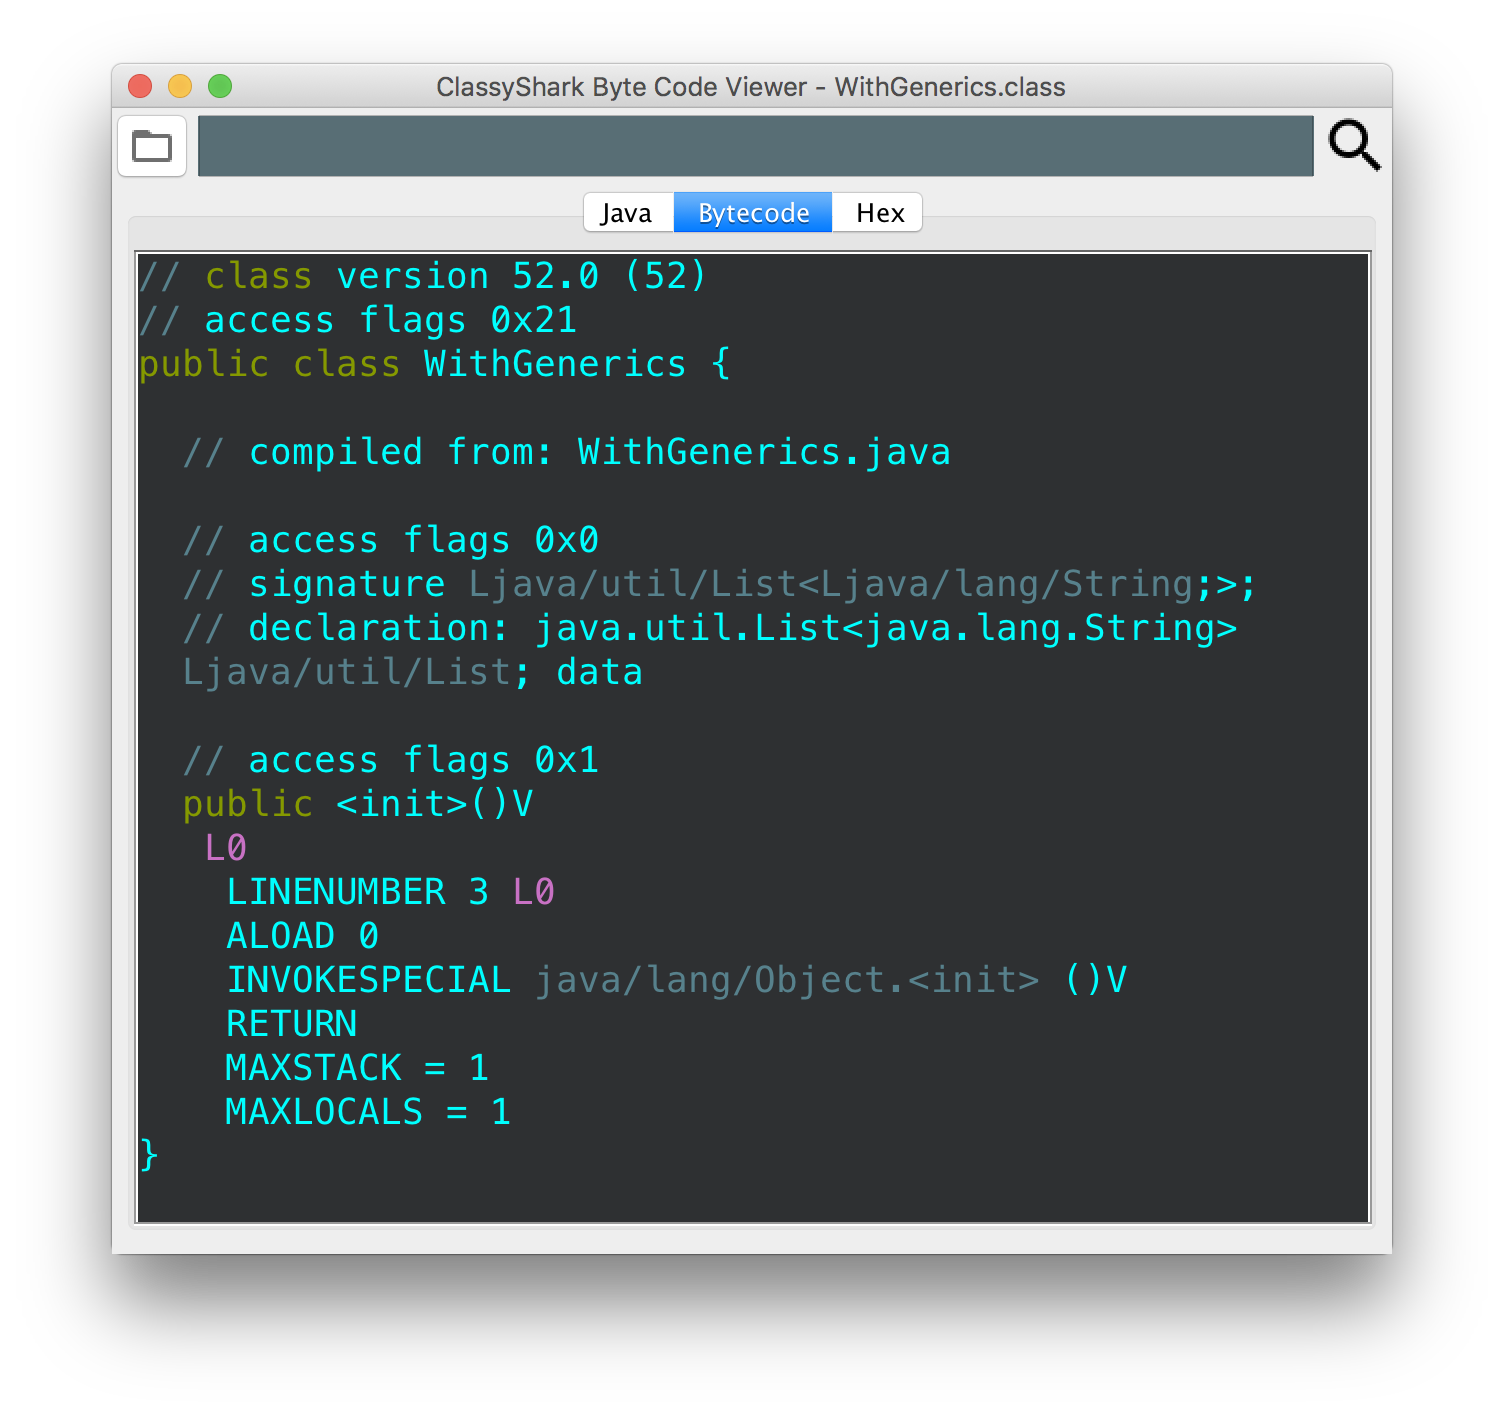
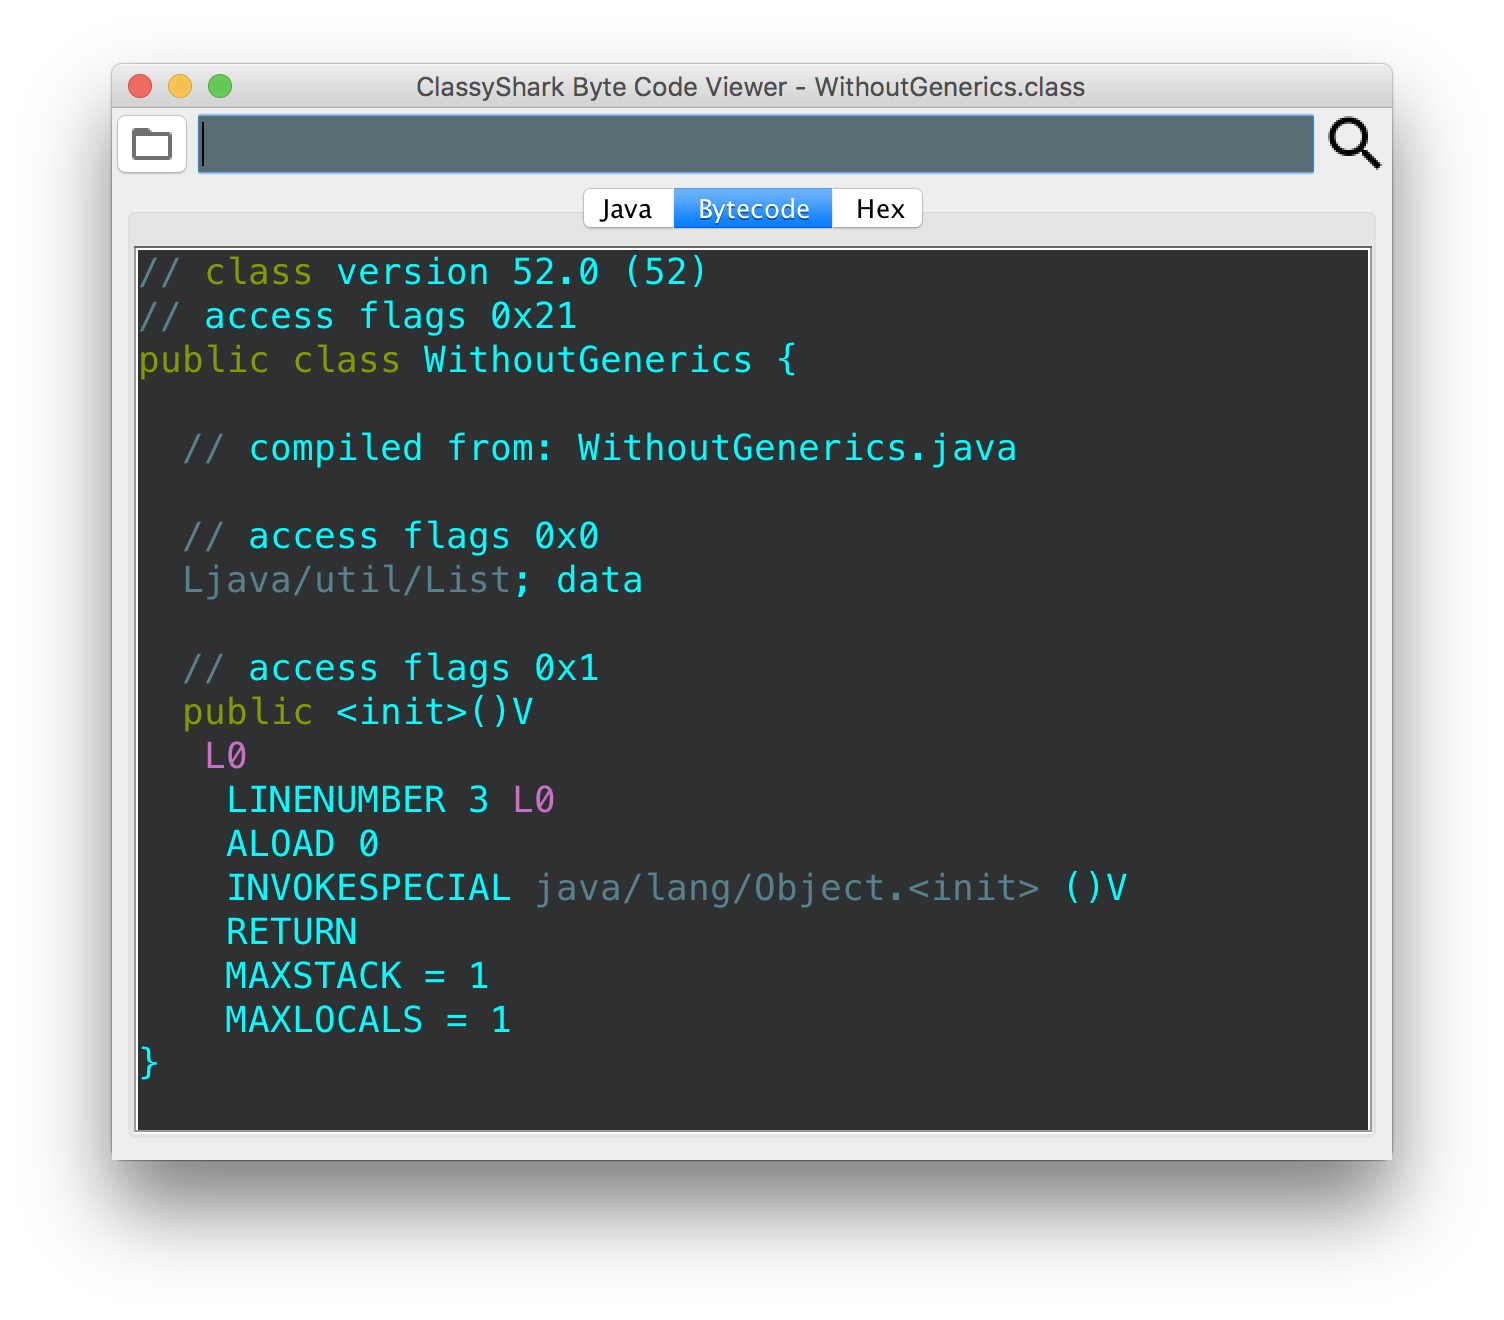
on bytecode directly. consider these two classes:
import java.util.List;
publicclassWithoutGenerics {
List data;
}
if we compile these via javac and then look at the bytecode (using
javap -v or using classyshark-bytecode-viewer), we’ll see:
notice that the bytecode is exactly the same for both classes. the only
exception is that the type information is present in the signature of the
WithGenerics class. if we are to run javap -v, we’ll see that this
signature references the constant pool, where the type actually is.
after running javac, we end up with two classes - InnerType.class and InnerType$Internal.class. looking at InnerType$Internal.class via javap -v, we see the class defined as:
public class InnerType$Internal<T extends java.lang.Object> extends java.lang.Object
if we try to display the class information like this:
we get InnerType$Internal, with a superclass of java.lang.Object. now let’s try to modify the example slightly, and create an anonymous subclass of Internal, by doing this:
Internal<String> internal =new Internal<String>(){
/* we could override methods here if we wanted to */};
by just making that change, the app now writes that the class is InnerType$1, with a generic superclass of InnerType.InnerType$Internal<java.lang.String>. this generic superclass is actually a parameterized type, so we can cast it and extract extra information by doing something like this:
if we run this, we now get an owner type of InnerType, a raw type of InnerType$Internal, and the actual type arguments of java.lang.String.
what about TypeToken?
if we look back at the first Gson example, we notice the use of a
TypeToken class provided by Gson. what does this class do? we care about two
classes here, TypeToken, and $Gson$Types. looking at the constructor
for TypeToken, we can see it does 3 things:
calls a canonicalize method on the type
gets the raw type
calculates a hashcode
most importantly, the canonicalize method exists in $Gson$Types and returns
a specific Type depending on the actual Type passed in - if it’s an array,
for example, a GenericArrayTypeImpl is made. in the example above, a
ParameterizedTypeImpl would be made, using the owner type, the raw
type, and the actual arguments.
in this case, as callers of Gson’s api, we make a new TypeToken with our
generic type parameters. internally, this generates a ParameterizedTypeImpl
that can then be used within Gson to do the right thing during
deserialization.
summary
in summary, whereas erasure erases generic types at compile time, libraries
like gson take advantage of the fact that some types erase to themselves to
have access to the generic type at runtime.
sometime in late december or early january, i decided to write a blog post per month. since it’s january 31st, i figured i should write about something to avoid dropping the ball so early in the year.
i introduced one of my friends to rxjava 2 not too long ago - his initial reaction was, “what? why would i want this?” - a few days later, it turned to, “hey, this is pretty cool!” - a few days after that, i learned several things from him as he ran into issues while migrating parts of his code.
consequently, i wanted to share these things, as they weren’t perfectly obvious to me (though in retrospect, they perhaps should have been).
also, i do realize that many consider subjects as “the mutable state of the reactive world” that should be avoided, but sometimes, they are a pretty good tool to use, especially when an entire code base is not yet reactive.
retry doesn’t actually retry
consider this code:
@TestpublicvoidtestRetry() {
TestObserver<Integer> ts =new TestObserver<>();
finalboolean[] val =newboolean[] { true };
Observable.just(1, 2, 3)
.map(i -> {
// fail only the first time that i = 2if (i == 2 && val[0]) {
val[0]=false;
thrownew IllegalArgumentException("throw!");
}
return i;
})
.retry()
.subscribe(ts);
ts.awaitTerminalEvent();
assertThat(ts.values()).containsAllOf(1, 2, 3);
}
this test passes, and the values emitted are [1, 1, 2, 3]. i’ll come back to the repetition in a tiny bit. now consider if we make a small change to this code, so that it uses a subject instead:
this test now fails, outputting only [1, 3]. so, why is this the case? the reason is that retry doesn’t actually retry anything - it just resubscribes to the source observable.
so if we think of the flow in this case, we call onNext with 1, which is observed by the subscriber. we then call it with 2, which fails because we throw an exception, and causes us to resubscribe. resubscribing to it doesn’t cause anything to emit. when 3 is passed in, we then observe it.
we can prove this by replacing the PublishSubject with a BehaviorSubject - doing so will result in [1, 2, 3] (because the subject caches the last onNext value it received, which was 2, so it gets replayed upon resubscribing).
note that the fact that retry resubscribes to the source observable is also why data can be repeated (as seen in the first example without subjects) - so when 2 fails the first time around, we re-subscribe, and thus get an onNext of 1, 2, and then 3, thus resulting in the repetition of the 1.
calling subscribeOn on a subject has no practical effect
this one was strange to me at first, but made sense once i realized that the reasoning for this was the same as that of why only the subscribeOn closest to the source matters - in summary, it’s because once onNext is called, downstream will receive the value on the same thread onNext was called on.
thus, if you have subject.subscribeOn(Schedulers.io()), but call subject.onNext(value) from the main thread, the downstream will receive onNext on the main thread.
see also what i wrote here in the section about “only the subscribeOn closest to the source matters” (while that article was about rx1, it’s still relevant in rx2).
observeOn’s buffer and rebatchRequests
this comes from my friend’s question on stackoverflow. suppose we have a case where ui events trigger some work, but we only want to do that work if it’s not currently already being done - an example of this is a button that does work - and let’s suppose this takes a good amount of time, during which someone can click the button a few more times. if the work is being done, we don’t want to restart it, but if no work is being done, we can start doing the work.
my friend realized, “aha, this sounds like something that backpressure can solve, let me use BackpressureStrategy.LATEST!” - and so he implemented his solution to look something like this:
this ended up failing, running the work 32 times - once for each and every emission of the subject. why?
as i learned from David’s answer, this is because observeOn has a buffer. since BackpressureStrategy.LATEST only keeps the latest value “if the downstream can’t keep up,” and since the default buffer size is 128 (unless it is overwritten by a system preference, in which case it must at least be 16), all the onNexts will be placed in a buffer until they can be sent downstream. in other words, backpressure doesn’t take effect here.
one solution i came up with based on this was replacing the first observeOn with observeOn(Schedulers.io(), false, 1) - this observeOn is called by the standard observeOn, with false for delayError, and bufferSize() for the buffer size. doing this results in the work only being done twice instead of 32 times. David said this would work, but would result in “time snapshots” as opposed to the latest event being processed (because as the worker was being processed, item 2 would be in observeOn’s queue, and would be sent downstream after the worker finishes - anything after 2 would be dropped until 2 is sent downstream).
David’s solution that actually gives you the latest was interesting - first, he used delay with 0ms as a means of switching threads without a buffer (i.e. .delay(0, TimeUnit.MILLISECONDS, Schedulers.computation())). then, he calls .rebatchRequests(1).
rebatchRequests was added as an experimental operator in RxJava 1, and this was the first time i had seen it. from my understanding, this is like a valve of sorts - it requests n items from upstream (based on the parameter passed in to it) - once 75% of them have been emitted downstream, it will request another n items from upstream.
it’s easier to understand what this is really doing when we look at how it’s implemented -
hey, cool! it’s calling observeOn with a buffer size of n, which, in this case, is 1. ImmediateThinScheduler is a scheduler that runs things immediately on the current thread.